Sigfox Callbacks
This lab will introduce Sigfox callbacks. You will create a simple middleware server that can recieve Sigfox callback requests.
Sigfox Callbacks
We will create a node.js server that will be called by Sigfox callbacks. This server will take the payload sent by the IOT device.
The Server will act as a "middleware". The middleware will take inbound data, check it, eventually reformat it and publish. We assume that this middleware will take only one deviceType, therefore only one callback.
For testing and convenience, you will set up the middleware on your laptop.
Setup
Install locatunnel:
npm install -g localtunnelRun localtunnel as follows to obtain a URL
lt --port 3000
your url is: https://eomkvzpxzj.localtunnel.me
We will use Express application to create the middleware. Use the Express application generator tool, express-generator, to quickly create an application skeleton. The express-generator package installs the express command-line tool. Use the following command to do so:
npm install express-generator -gTo generate our application skeleton, run the following:
express sigfoxMiddlewareThis will create a sigfoxMiddleware folder containing the skeleton app. Install dependencies and run it :
cd sigfoxMiddleware/
npm install
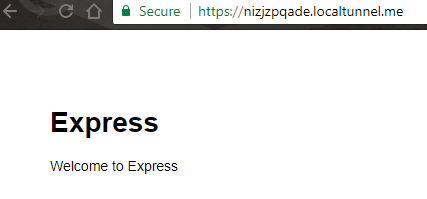
nodemon startNow if you go to http://localhost:3000 or https://eomkvzpxzj.localtunnel.me you should see :
Test the POST route
Now modify skeleton app to respond to data from Sigfox. We will configure Sigfox to use HTTP POST requests to the server via the route. For now we'll just ouput the request body to the console. Add the POST data route to 'index.js' as follows:
/* POST data */
router.post('/data', function(req, res, next) {
    console.log("POST : " + JSON.stringify(req.body));
    res.send("Post Successful");
});
The server should restart automatically when any changes are detected. However, you may need to restart localtunnel Now you should install a Restful client. If you use Chrome, try one of the following: - Postman Chrome Extension - Advanced Rest Client
Check the server is working properly by submitting the following request :
URL : your localtunnel url  /data/
Method POST
Header : Content-Type : application/json (if you forget this it won’t work)
Body Raw JSON :
{
    "time" : "{time}",
    "device" : "{device}",
    "duplicate" : "{duplicate}",
    "snr" : "{snr}",
    "rssi" : "{rssi}",
    "avgSnr" : "{avgSnr}",
    "station" : "{station}",
    "lat" : "{lat}",
    "lng" : "{lng}",
    "seqNumber" : "{seqNumber}",
    "data" : "{data}"
}
When you hit SEND you should see this in your console window :

Authentication
As the Middleware will be used by a single server (the Sigfox server) and will not change, we can use basic-auth-connect. Stop the Express server and install basic-auth-commect:
npm install -S basic-authCreate a new auth.js file in your sigfoxMiddleware folder and enter the following:
// Source : http://www.9bitstudios.com/2015/10/basic-authentication-in-node-js-express-applications-and-apis/

var basicAuth = require('basic-auth');

exports.basicAuthentication = function(req, res, next) {

    function unauthorized(response) {
        res.set('WWW-Authenticate', 'Basic realm=Authorization Required');
        return res.sendStatus(401);

    };

    var user = basicAuth(req);

    if (!user || !user.name || !user.pass) {
        return unauthorized(res);
    };

    if (user.name === 'testUser' && user.pass === 'testPass') {
        return next();
    } else {
        Console.error("Authorized : " + user.name + ":" + user.pass);
        return unauthorized(res);
    };

};
You can now protect any route by adding auth.basicAuthentication to the route middleware. "route/index.js" is now :
var auth = require("../auth.js");

/* POST data */
router.post('/data', auth.basicAuthentication, function(req, res, next){
    console.log("POST" + JSON.stringify(req.body));
    res.send("Post Successful");
});
This is VERY basic, but if we are using HTTPS between Sigfox servers and our middleware the authorization token will not be disclosed, so no risk for interception.
Now to test this, go to your Rest cleint, choose basic Auth, and you should get the option to fill in your login and password. It should generate a HTTP header similar to the following:
The header is
Authorization : Basic dGVzdFVzZXI6dGVzdFBhc3M=Sigfox Callbacks
Go to https://backend.sigfox.com/
Go to Device type and click on the type’s name,
Click Callbacks on the left hand side and new and Custom callback
The parameters for the callback are :
Type DATA UPLINK
Channel URL
URL Pattern http://tgesxrvorp.localtunnel.me/data/
HTTP Method POST
Headers : Authorization : Basic dGVzdFVzZXIrdGVzdFBhc3MK // Change to your token
Content type : application/json
Body :
{
"data" : "{data}"
}
You can now connect your sigfox board and send a message. Use the lab from last week to send the hello world message. You should get something like the following in your console :
POST{"data":"48656c6c6f20576f726c64"}
POST /data/ 200 141.957 ms - 15
In order to continue the testing without using sigfox, you can continue with the Rest client.
Validation
No that the communication to the middleware server is reasonably secure, we should now validate the data recieved from the Sigfox backend Install express-validator :
npm install -S express-validatorAdd this to the app.js
var validator = require("express-validator");
…
app.use(validator()); // This MUST be right after app.use(bodyParser.urlencoded({ extended: false }));
Now modify our router POST function in to add the validations :
/* POST data */
    router.post('/data', auth.basicAuthentication, function(req, res, next) {
   console.log("POST" + JSON.stringify(req.body));

    req.checkBody("data", "Did not recieve valid data").notEmpty().isAlpha();//YOU CAN MODIFY THIS TO SUIT YOUR OWN PURPOSES.

    var errors = req.validationErrors();

    if (errors) {
        res.send(errors);
        return;
    } else {
        // Normal processing
        // return the body received
        res.send("Post successfull");
    }

});
At this point you MUST create your custom validation for your data pattern.
You now have a working server that will accept incoming data from Sigfox callbacks. We will now store the data in a suitable data store (MongoDB).
Mongo
mLab
mLab is a Database-as-a-Service for MongoDB, a no-SQL database. To get started with mLab, you must first create a mLab account. When that’s complete, you can a database for our Sigfox generated data.
Database Subscription
On your account’s Home page, click the “Create new” button. Make all the desired selections and fill in the requested fields. Make sure to choose the Sandbox/Fee option Create a new database called sigfox_data with the following configuration:
- cloud provider: Amazon, location: EU(Ireland)
- plan: Single Node, Sandbox (free)
- database name: sigfox_data
Review your choices and when you’re ready, click the “Submit Order” button. Your new deployment should be listed on your account’s Home page. You will now be able to navigate to its home (administrative) page.
MongoDB
Use NPM to install mongobd in your Node application:
npm install -S mongodbIt would be a good idea to externalise your authentication credentials in a config file. Create a new config file called config.js in the sigfoxMqtt folder and enter the following:
var config = {};

config.dbUser ='YOUR_USER' ;
config.dbPassword = 'YOUR_PASSWORD';

module.exports = config;
Every time data is recieved from Sigfox backend, the service should insert the data into a mongo Collection. Modify our router POST function in to include the following code:
...
var config = require("../config.js");
var MongoClient = require('mongodb').MongoClient;
// Connection URL. GET THIS URL FROM YOUR mLAB database admin page
var url = 'mongodb://'+config.dbUser+':'+config.dbPassword+'@YOUR_DB.mlab.com:21965/sigfox_data';

...

/* POST data */
router.post('/data', auth.basicAuthentication, function(req, res, next){
    console.log("POST: " + JSON.stringify(req.body));

    // Use connect method to connect to the Server
    MongoClient.connect(url, function(err, db) {
        console.log("Connected to DB");
        var collection = db.collection('sensor_data');
        collection.insertOne(
            req.body, function(err, result) {
                console.log("Inserted document into the sensor_data collection");
                res.send("Post Successful");
            });
    });
});

...
You now have a server that will store incoming data from Sigfox callbacks in a data store (MongoDB). Test the service with your Rest client and check that the data is correctly stored in the database.
Custom Data
As discussed in class, Sigfox packet can contain 12 bytes of data.
 In order to make optimal use of this payload, it is worth examinint the byte requirements of each data item(or signal) you wish to transmit.
For this part of the experiment, we will use the Pycom Pysense expansion board to provide sensor data. In the absence of this you can use hard coded data or connect analog sensors connected to the regular expansion board.
In order to make optimal use of this payload, it is worth examinint the byte requirements of each data item(or signal) you wish to transmit.
For this part of the experiment, we will use the Pycom Pysense expansion board to provide sensor data. In the absence of this you can use hard coded data or connect analog sensors connected to the regular expansion board.
Convering to byte array.
Up to now we have sent data in ascii format, with each character repersented by a one byte. This is not efficient for telemetry in numerical format. In this example we will retrieve two sensor values from the pysense expansion board, temperature and light intensity. However you can skip the next step by substituting the sensor output for simulated values.
Setting up Pycom Sensor expansion board:
Follow the instructions here to install the latest firmware and transfer the nessesary libraries to the PySense board. You can connect it to your laptop in the same way as the regular expansion board. We will use temperature and light sensor values.
Update code
If you're using the PySense board, the following code will send the temperature and light sensors. You have only 12 bytes of data in the payload. The values we receive from the sensors are specified in the associated spec sheets. For example, the light sensor returns a 16 bit value. For our purposes here, we will put the temperature value in the first 2 bytes and the light sensor in the next 2 bytes. The following code constructs a byte array using the temperature and light values.
from pysense import Pysense

from SI7006A20 import SI7006A20

from LTR329ALS01 import LTR329ALS01

import time
from network import Sigfox
import socket

py = Pysense()

si = SI7006A20(py)

lt = LTR329ALS01(py)

# init Sigfox for RCZ1 (Europe)
sigfox = Sigfox(mode=Sigfox.SIGFOX, rcz=Sigfox.RCZ1)

# create a Sigfox socket
s = socket.socket(socket.AF_SIGFOX, socket.SOCK_RAW)

# make the socket blocking
s.setblocking(True)

# configure it as uplink only
s.setsockopt(socket.SOL_SIGFOX, socket.SO_RX, False)

#send temp and light every 30 seconds
while True:
    temperature = int(round(si.temperature()*100)) #send temp as rounded integer * 100
    light = lt.light()[0]  #light
    print(str(temperature) + ":"+str(light))
    messageBytes=bytes((temperature & 0xff, ((temperature >> 8) & 0xff),light & 0xff, ((light >> 8) & 0xff)))
    s.send(messageBytes)
    time.sleep(30)
If you don't have the PySense board, the following code will generate hard coded values in the same range.
from pysense import Pysense
import time
from network import Sigfox
import socket

py = Pysense()


# init Sigfox for RCZ1 (Europe)
sigfox = Sigfox(mode=Sigfox.SIGFOX, rcz=Sigfox.RCZ1)

# create a Sigfox socket
s = socket.socket(socket.AF_SIGFOX, socket.SOCK_RAW)

# make the socket blocking
s.setblocking(True)

# configure it as uplink only
s.setsockopt(socket.SOL_SIGFOX, socket.SO_RX, False)

while True:
    #temperature = int(round(si.temperature()*100))
    temperature = 24
    light = 350
    print(str(temperature) + ":"+str(light))
    messageBytes=bytes((temperature & 0xff, ((temperature >> 8) & 0xff),light & 0xff, ((light >> 8) & 0xff)))
    s.send(messageBytes)
    time.sleep(30)
Run the code on the Pycom boards. Log into the sigfox backend and check the values appear.
Sigfox Back End
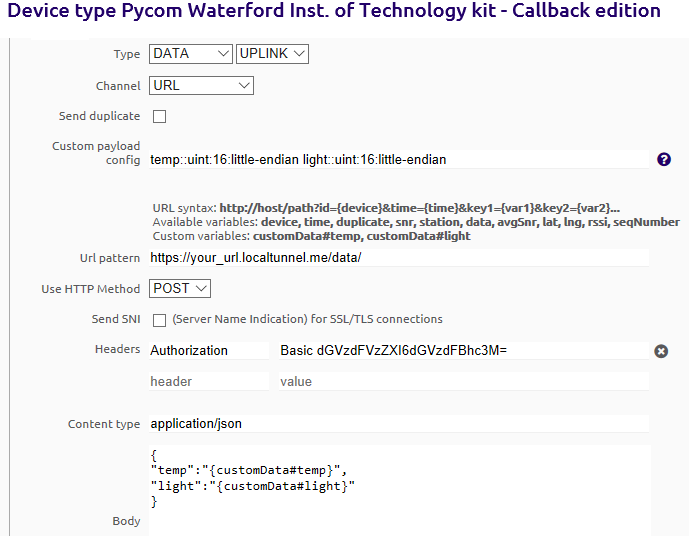
To configure the back end to display the values correctly, go to the "Device Type" tab and choose the "Pycom Kit". You'll be presented with an information screen and in the top right corner, you'll find an "Edit" button. Under "Display", you can choose "Custom Grammar" to set custom configuration to "temp::uint:16:little-endian light::uint:16:little-endian"; this will turn your messy hexadecimal message into a more readable message.

Now, update the callback as follows to encode the data properly. For this you will change the to discribe the structure of your message. Go to the "Device Type" tab and choose the "Pycom Kit". Select CallBacks and click edit. Change the config as follows:
Now start your Node.js middleware - you should see the temp and light values begin to appear in your MongoDB.
Update Middleware Validation
Now update the validator code in the /routes/index.js to validate the temperature and light data:
...
req.checkBody("temp", "Did not recieve valid data").notEmpty().isInt();
req.checkBody("light", "Did not recieve valid data").notEmpty().isInt();
...